.png&w=96&q=75)

AI auto-reply in Zendesk is a powerful way to handle repetitive customer support tickets efficiently. It uses generative AI to provide dynamic, conversational responses to common questions like password resets or return policies. This reduces response times by 40–60% and decreases ticket backlogs by 30–50%. Here's what you need to know:
- Two automation options: Zendesk offers rule-based triggers for simple responses and AI auto-replies for managing complex, repetitive inquiries.
- AI advantages: AI auto-replies analyze customer messages, pull relevant information from your help center, and autonomously resolve tickets.
- Setup process: Train the AI using at least 10 well-written help center articles, configure channels, and test responses before going live.
- Performance tracking: Monitor metrics like automated resolution rate, rejection rate, and cost per ticket to refine your system.
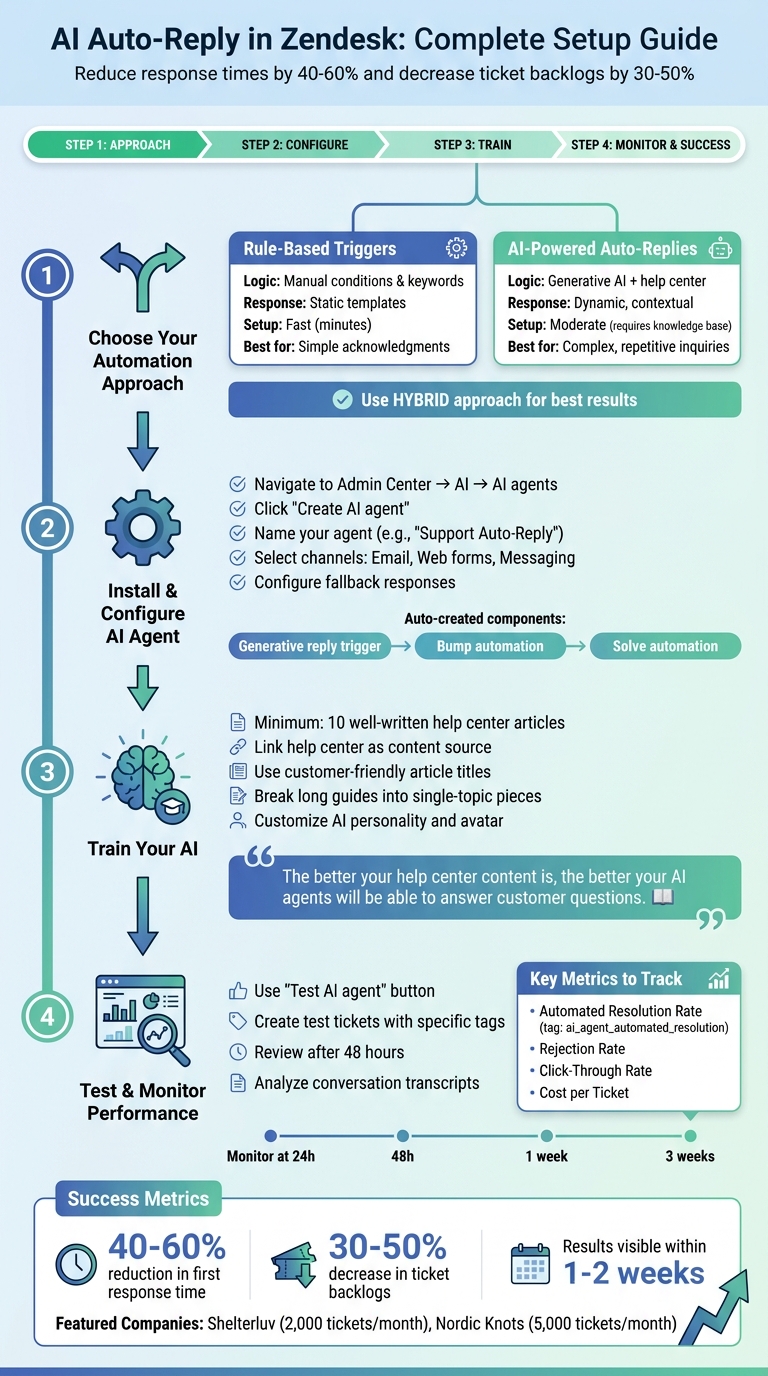
How to Set Up AI Auto-Reply in Zendesk: 4-Step Implementation Guide
Types of Auto-Reply in Zendesk
Zendesk offers two main ways to automate ticket responses: rule-based triggers and AI-powered auto-replies.
- Rule-based triggers rely on if/then logic. You set specific conditions- like certain keywords or ticket properties- and the system sends a fixed, pre-written response.
- AI-powered auto-replies, on the other hand, use generative AI and Large Language Models to analyze customer messages. These replies are dynamic, tailored to the intent, tone, and complexity of the inquiry, pulling information directly from your help center content.
Triggers are great for simple acknowledgments or linking to resources, while AI agents can handle more complex tasks, such as resolving Tier 1 tickets. These include things like password resets, order tracking, or answering policy-related questions. All without human involvement. Companies using AI automation typically see a 40–60% reduction in first response time and a 30–50% decrease in ticket backlogs.
Zendesk AI vs Traditional Support Bots
| Feature | Rule-Based Triggers | AI-Powered Auto-Replies |
|---|---|---|
| Logic Source | Manual conditions & keywords | Generative AI using help center content |
| Response Type | Static, pre-defined templates | Dynamic, contextually generated text |
| Setup Time | Fast (minutes) | Moderate (requires knowledge base optimization) |
| Resolution | Mostly acknowledgment/routing | Can resolve issues autonomously |
| Maintenance | Requires manual updates | Continuously learns from knowledge base updates |
Triggers are straightforward to set up, but they need manual updates over time. AI auto-replies, however, depend on a solid knowledge base. At least 10 well-written articles addressing common customer questions are recommended to ensure accurate AI responses.
Which Approach to Use
- When to use triggers: They’re ideal for simple, one-way notifications such as "Request received" emails or for basic ticket routing based on specific properties.
- When to use AI auto-replies: These shine when managing high-volume, repetitive inquiries that require conversational responses.
A hybrid approach often delivers the best results. For example, triggers can handle internal routing or notifying agents, while AI-powered replies manage customer-facing resolutions. Picture a SaaS company handling 3,500 tickets a month: triggers could route VIP tickets to specialized agents, while AI resolves common Tier 1 issues like password resets or order tracking.
Start small by focusing on frequently asked questions to test accuracy. After just 48 hours of use, monitor AI performance and refine as needed before expanding to more complex scenarios. This balanced strategy ensures efficient ticket management and a better experience for both customers and support teams.
sbb-itb-97114f1
How to Set Up Triggers in Zendesk
Triggers in Zendesk are automated rules that take specific actions when a ticket is created or updated. While AI auto-replies handle complex issues, triggers are perfect for managing standard responses efficiently. These rules rely on Conditions and Actions to determine when and how to respond.
Creating Your First Trigger
To get started, head to the Admin Center. From the sidebar, go to Objects and rules and select Business rules > Triggers. Click on Add trigger.
Name your trigger something like "Auto-reply for new support requests" and assign it to a relevant category. Then, define the necessary conditions under "Meet ALL of the following conditions":
- Ticket | Is | Created: Ensures the trigger runs only when a ticket is first created.
- Status | Is | New: Targets tickets that haven’t been addressed yet.
- Requester | Role | Is | (end-user): Prevents auto-replies from being sent to agents or system notifications.
In the "Meet ANY of the following conditions" section, specify which channels should activate the trigger. For example:
- Received at | Is | [your support email address]
- Channel | Is | Web form
For the action, choose Notify by > User email and draft your response template. Use dynamic placeholders like {{ticket.id}} for ticket numbers or {{ticket.requester.first_name}} for personalization. To track the trigger's performance later, add a tag such as auto_replied using the Add tags action.
Once the basic trigger is set up, you can fine-tune it by adding more specific conditions and keywords.
Adding Conditions and Keywords
To make your trigger more precise, you can incorporate intent and sentiment detection. Add a condition under "Meet ANY" like Intent | Is | [Specific Intent]. For example, this could activate the trigger when a customer’s intent matches "password reset" or "order tracking."
To improve keyword matching, ensure your help center articles use language that aligns with customer queries. For example, instead of a formal title like "Credential Recovery", opt for something clearer like "How do I reset my password?" This alignment helps both keyword and intent-based triggers function more effectively.
Finally, add an exclusion condition to avoid duplicate responses. Under "Meet ALL", include Tags | Contains none of | agent_copilot_enabled. This ensures the trigger won’t activate if another automation has already handled the ticket.
How to Set Up AI Auto-Reply in Zendesk
AI auto-reply in Zendesk goes beyond simple keyword triggers. Instead, it evaluates each query and crafts a complete, contextually relevant response. This approach is up to three times more effective than traditional workflows. By pulling information from your help center, ticket history, and macros, AI auto-reply ensures dynamic and accurate responses. Here's how you can set it up.
Installing the AI App
Start by heading to the Admin Center in Zendesk. Navigate to AI > AI agents, and click Create AI agent. Give your agent a name like "Support Auto-Reply" and select the channels it will operate on - email, web forms, or messaging.
When you enable the AI agent for email or web forms, Zendesk automatically sets up three essential components: a "Generative reply" trigger, a "Bump" automation, and a "Solve" automation. These tools handle ticket management without requiring manual input. Don’t forget to configure a fallback response for situations where the AI can’t provide an answer.
Training the AI on Your Data
After installation, the next step is training your AI using your existing resources. Link your help center to the AI agent under Content sources. The AI will use help center articles, macros, and any external content you’ve connected to generate replies. To maximize its effectiveness, ensure your help center contains at least 10 articles that address common customer questions. Breaking down longer guides into shorter, single-topic pieces can help the AI process your content more effectively.
You can also customize the AI’s personality and avatar to align with your brand identity. Use article titles that reflect the language your customers use. For instance, "How do I reset my password?" is clearer and more relatable than "Credential Recovery Procedures."
Testing Before Going Live
Before rolling out your AI agent, use the Test AI agent button in the Admin Center. This allows you to input sample queries and review the AI’s responses. Test edge cases and unusual phrasing to pinpoint any weaknesses in the system.
For live testing, create tickets with a specific tag, such as agent_copilot_enabled, to trigger AI responses for a limited group. Make sure test emails come from non-agent email addresses, as the AI ignores comments from Zendesk agents. After 48 hours, review the AI’s performance using the Insights dashboard. Analyze conversation transcripts to identify both successful interactions and areas where the AI struggled. You can also set up custom ticket views to monitor resolved and unresolved tickets, giving you a clear picture of the AI’s effectiveness.
Tracking Auto-Reply Performance
Keeping tabs on specific metrics is essential to evaluate how well your AI auto-reply system is working. Focus on key indicators like automated resolution rate, rejection rate, and cost per ticket. These metrics directly influence both support efficiency and customer satisfaction. For instance, companies like Shelterluv and Nordic Knots use these insights to fine-tune their processes.
Metrics That Matter
Automated resolution rate tracks the number of tickets fully resolved by AI without human intervention. Zendesk makes this easy by tagging such tickets with ai_agent_automated_resolution. Shelterluv, which handles around 2,000 tickets each month, monitors this metric daily to ensure their AI is performing as expected.
Rejection rate measures how often users or agents reject the AI’s suggestions. A high rejection rate could indicate the AI is falling short. Use Zendesk’s Insights dashboard to analyze trends in both rejection and engagement rates, including click-through rates for suggested articles. This data can help you identify if your help center content needs adjustments.
Some teams tweak how they track CSAT (Customer Satisfaction) for auto-resolved tickets, as traditional surveys are typically designed for human interactions. If you decide to measure CSAT for AI-resolved tickets, keep these results separate to avoid skewing metrics for human-agent performance.
Keep an eye on AI performance over different timeframes - 24 hours, 48 hours, one week, and three weeks - to identify patterns. Nordic Knots, managing about 5,000 tickets monthly, uses custom ticket views filtered by tags like ar_marked_unhelpful and ar_suggest_false to review AI performance regularly.
| Metric | What It Measures | How to Track It |
|---|---|---|
| Automated Resolution Rate | Tickets resolved solely by AI | Use the ai_agent_automated_resolution tag in Explore |
| Rejection Rate | Frequency of dismissed AI suggestions | Insights dashboard |
| Click-Through Rate | Engagement with AI-suggested articles | Insights dashboard |
| Cost per Ticket | Average cost of resolving a ticket | Divide total support cost by tickets resolved |
When you notice a drop in these metrics, dive into ticket transcripts and review tags to uncover potential issues.
How to Improve Results Over Time
If your metrics start to decline or level off, it’s time to refine your AI system. Start by reviewing conversation transcripts for unresolved tickets. This can reveal patterns in failed interactions. For example, if password reset requests often trip up the AI, consider creating a dedicated help center article or updating the process.
Tags like ar_suggest_false are incredibly useful for identifying when the AI offered a suggestion but couldn’t find a relevant article. These instances highlight gaps in your help center content that need to be addressed.
Improving your AI’s responses is an ongoing process. If suggestions are frequently inaccurate, tweak the instructions your AI follows and test the changes across multiple iterations. Simplify your help center content by breaking long articles into shorter, topic-specific guides. For instance, instead of one lengthy article, create separate guides for tasks like resetting a password, updating billing information, or closing an account.
The ar_marked_unhelpful tag can help you identify articles that aren’t resonating with users. Update these articles using language and solutions pulled directly from ticket transcripts. Regularly reviewing and refining these metrics ensures your Zendesk auto-reply setup stays effective and continues to improve over time.
Conclusion
Setting up AI auto-reply in Zendesk involves a few key steps: reviewing your help center content, configuring your channels, building your AI agent, and launching it. Companies like Shelterluv and Nordic Knots saw impressive results, including a 40–60% faster first response time and a 30–50% decrease in ticket backlogs within just 1–2 weeks. Use the Insights dashboard to track performance and fine-tune your setup by monitoring critical metrics. These actions streamline ticket resolution and enhance customer satisfaction.
Ready to scale your support without adding more staff? Give CoSupport AI a try today.
.png)


.png&w=828&q=100)
.png&w=96&q=100)
.png&w=828&q=100)
.png&w=96&q=100)